Woodworking Plans for 3 Drawer Tool Box
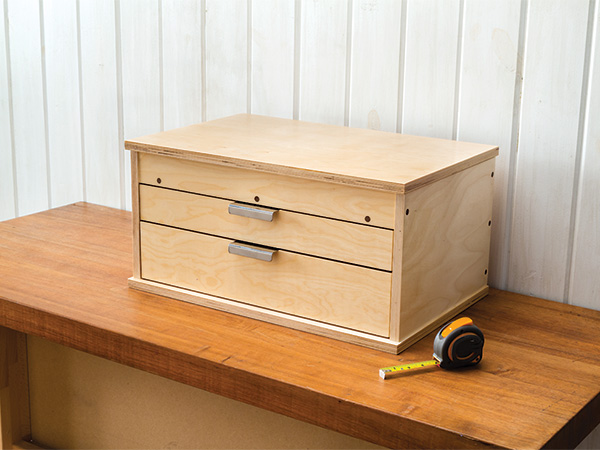
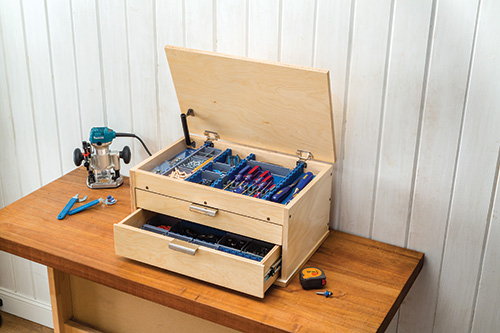
If one of your New Year'southward resolutions for 2020 is to become your store better organized, this easy-to-build, double drawer tool chest can help keep that promise. Ours is made of i/four," 1/ii″ and 3/4″ Baltic birch plywood – this is a practical shop accessory, not a jewelry box. We used Rockler's Drawer Lock Router Chip in the router table to form sturdy, interlocking corner joints for the drawers. The case's butt joints are reinforced with stepped Miller Dowels that are every bit easy to install equally drilling holes and pounding them in.
Download this consummate programme.
Making the Drawers
Your offset inclination might exist to brand the tool chest's case offset, just and then the drawers must be precisely fitted to its interior. The easier route – especially considering the interlocking nature of the corner joinery and how that impacts final part sizing – is to make the drawers first and wrap the example around them. Kickoff by cutting 2 vii-1/2″ 10 13″ pieces of 1/2″-thick Baltic birch plywood. They'll yield all four upper and lower drawer sides.
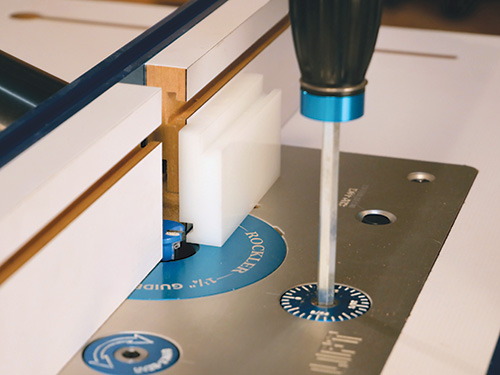
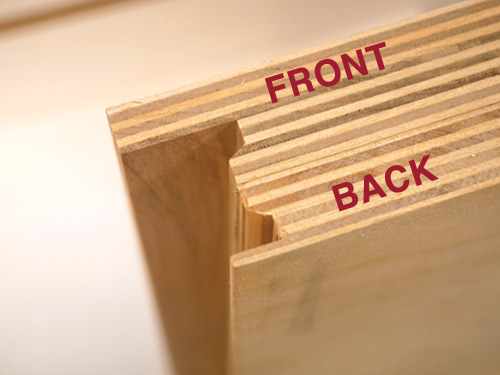
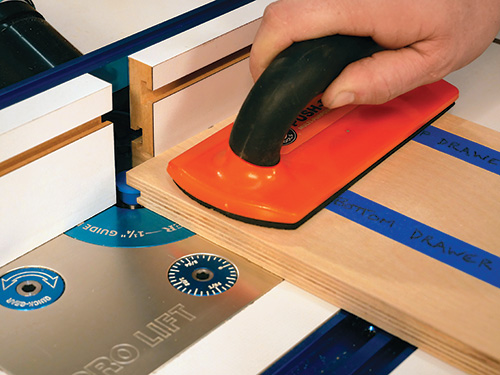
Install the drawer lock bit in your router tabular array, and then take a close await at the photos. Observe that the geometry for a drawer lock articulation consists of a natural language-and-groove profile on one piece that fits into a mirror image tongue-and-groove on the mating slice. Adjust the flake vertically so the cutter creates an equal-sized tongue-and-groove. Rockler offers a plastic setup block that can make finding this flake meridian quick and easy.
It too can help y'all determine bit projection out from the router table fence. Just, if yous don't have the benefit of the setup cake, move the fence until the elevation portion of the cutter volition cut i/4″ into the drawer side stock, and raise the bit 3/eight″ above the table.
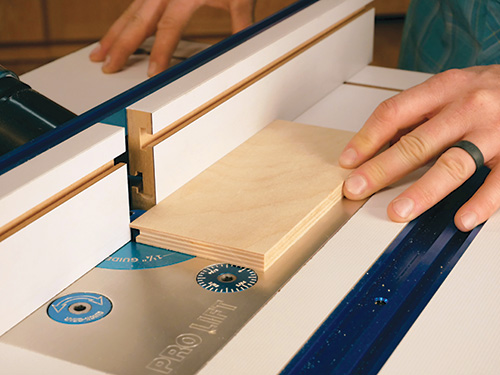
When the scrap'due south settings are dialed in, knife a line across the face of the plywood 3/eight″ from both ends where the top corner of the router bit will intersect it, to aid minimize tearout during routing. Now, carefully mill the profile across one face up of both workpieces, on both ends, with the blanks standing vertically against the router tabular array argue, to form the drawer side profile of the 4 corner joints. Set these workpieces bated for the moment.
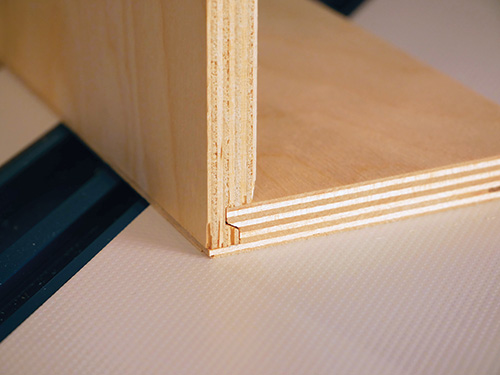
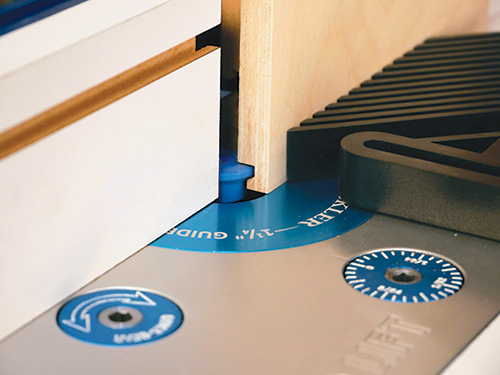
Rip and crosscut another piece of ane/2″ Baltic to 7-1/2″ x 20-iii/4″ to create both drawer backs. Y'all'll see that the drawer back has a thin, elongated tongue that covers the ends of the drawer sides.
To reach this overlapping profile, reset the bit's projection from the fence using the other stop of Rockler'due south setup block as a guide (the bit'due south project changes to 3/8″ but its height remains the aforementioned). So mill this cut into both ends of the drawer back stock. Set this workpiece bated for now too.
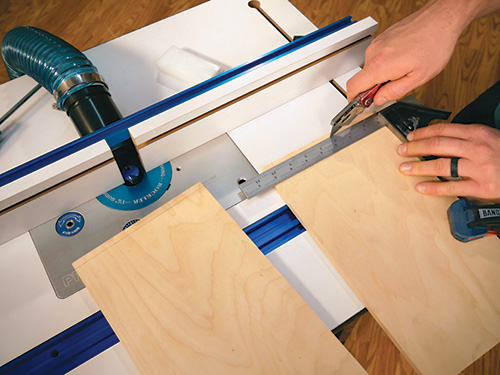
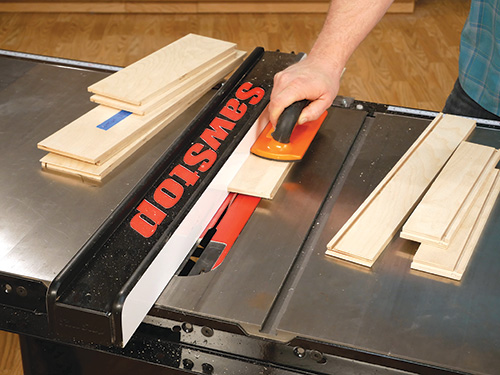
The drawer faces come next, and we'll harvest them from the same piece of plywood every bit the tool chest's top rail. Starting time with a piece of 3/iv″ plywood measuring 10-3/4″ x 21-3/four″. Cutting the iii″-broad front rail off the height of the panel (come across photograph 6). So, trim i/8″ off each curt stop of the remaining wider piece to create a unmarried combined blank for both drawer fronts.
Written report the photos and you'll meet that the thicker drawer forepart fabric creates a natural language that both covers the drawer sides and also conceals the ends of the drawer slides. The goal for this natural language length is 7/8″. To course it, brand a series of passes into the ends of the drawer front workpiece, shifting the contend back a niggling with each laissez passer to betrayal more than of the router bit.
Make each new cutting in a scrap slice beginning to check your progress, before continuing to rout the drawer front ends. Finish cutting when the length of the inside confront of the drawer forepart blank matches the length of the within face of the drawer dorsum blank.
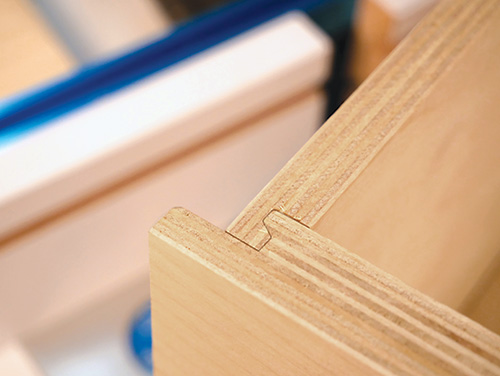
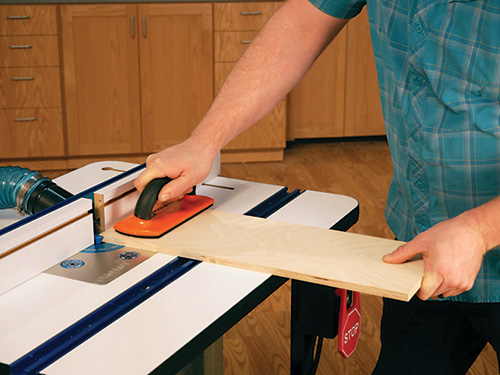
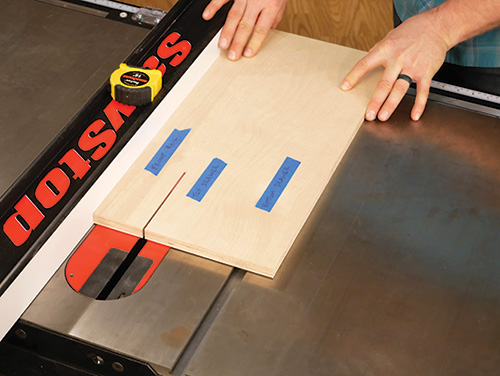
At present, dry-fit the corner joints. If they lock together well, rip the drawer side and drawer dorsum blanks to their final widths. So lower the saw blade to 1/4″ and plow 1/iv″-wide grooves along the inside bottom edge of each drawer office to fit your 1/4″ drawer bottom plywood. Cutting these grooves carefully and so the plywood volition fit them snugly.
Assemble the drawer boxes again in order to take inside measurements for the drawer bottoms. Cutting the ii drawer bottoms to size. Finish-sand all the drawer parts, and bring the drawer boxes together with gum and clamps.
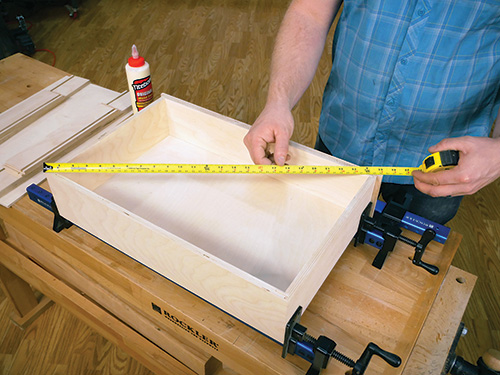
Before the mucilage begins to set, be sure to check the boxes for square by measuring their diagonals: if the numbers match, y'all're all set. If they don't match, adjust the clamping pressure level or the clench positions to correct the problem; out-of-foursquare drawers are a hassle to correct after the fact — especially when they're made of plywood that can be mitt-planed to right things.
Lock-Align Drawer Organizers
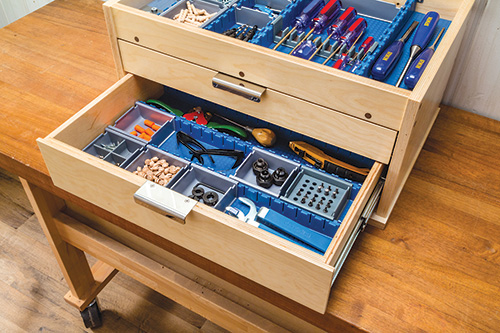
A tool chest without some grade of inner dividers will quickly get a disorganized dumping ground for hand tools and other small parts. Just Rockler's arrangement of Lock-Align Drawer Organizers can assistance.
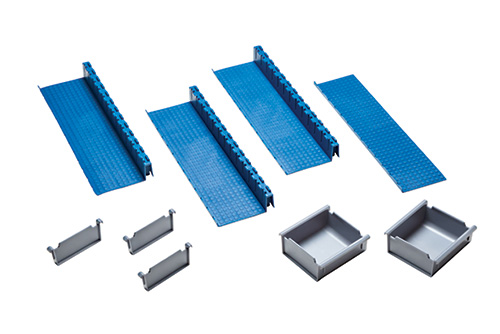
The interlocking, synthetic safety components create a grid of compartment walls that yous can customize to the size of the drawer by cutting with a utility pocketknife or scissors.
So, dividers and small parts bins slide into slots in the walls and hook over their rims for a secure connection. A starter kit of trays and bins is bachelor. Additional trays, bins and holders are sold separately.
Assembling the Chest Carcass
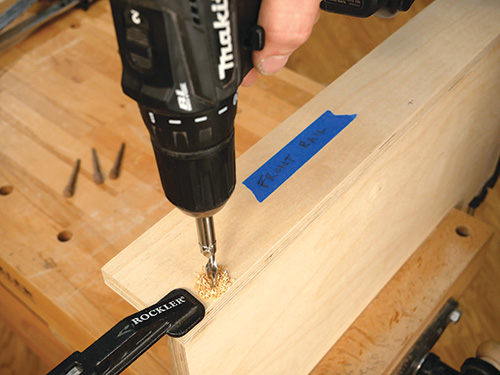
Cut a pair of workpieces for the chest divider and back console to size from 3/4″ plywood. Terminate-sand them, along with the forepart rail. And so glue the front runway to i long border of the divider so the rail'south bottom edge is flush with the lesser face up of the divider.
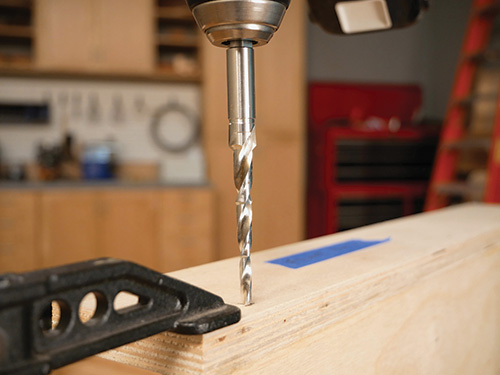
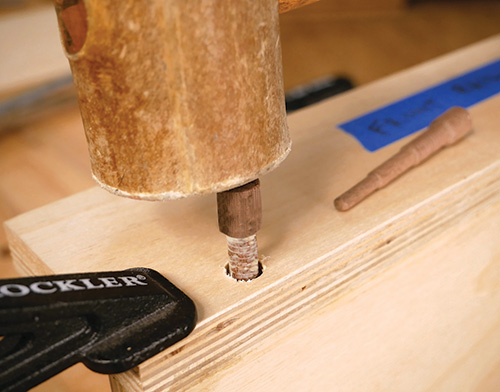
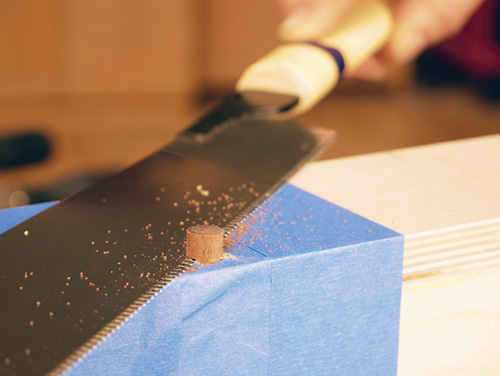
When the joint dries, you tin can reinforce it with three Miller Dowels as we did, or use countersunk #8 screws or even brad nails, if you lot adopt. Now, draw a layout line 3″ in from one long edge of the back panel.
Marshal the bottom back edge of the divider to this line, and glue and dowel the divider and back panel together to complete the breast's inner subassembly.
Cut the chest's side panels to shape and sand them. Attach the sides with mucilage and dowels to the inner subassembly — brand the back edges of the side panels affluent with the back face of the back panel.
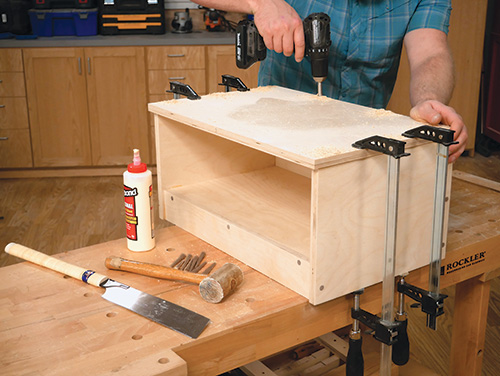
Cutting, sand and install the chest's bottom panel next, with its dorsum edge flush to the back of the carcass and its ends extending evenly out from the side panels. Utilize dowels or other fasteners to reinforce these joints, too.
Installing Hardware
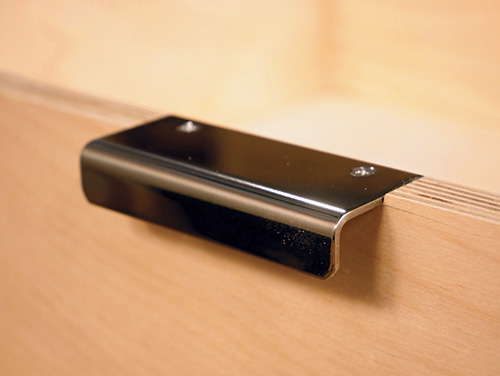
The finish line for this projection is in sight, but in that location's a little more milling yet to do. Rockler's metal flush-mount drawer pulls require a one/8″-shallow mortise cut into the top faces of the drawers. The easiest way to achieve this is to create a simple routing jig that controls the length of the mortise cuts, then use a directly bit to cut them.
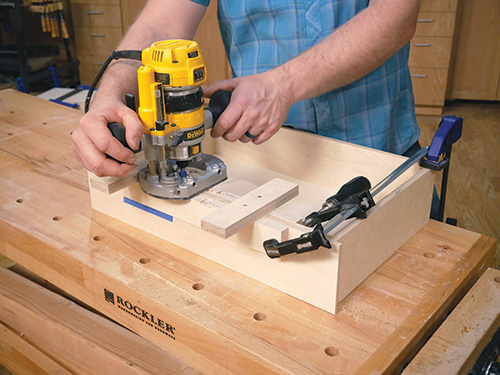
Our routing jig amounts to a pair of long scraps that straddle the drawer face and also help to stabilize the router base during mortising. Two crosspieces, fastened to the long pieces, stop the router's travel and limit the length of the mortises to fit the 120 mm-long pulls. Once the drawer faces are mortised, fasten the pulls to them with the included screws.
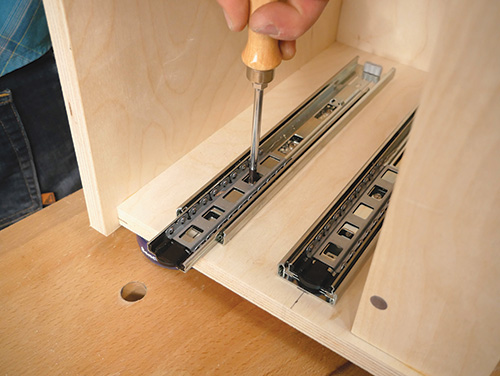
Next upward are the drawer slides. Carefully lay out the positions of the cabinet side components of the slides inside the breast. Inset their forepart edges 7/16″ back from the front of the chest, and fasten them in place with the included screws. It'due south a good idea to use the slotted holes provided on the slides for the screws, in case you need to move the slides slightly upward, down or back and forth. Fasten the drawer side member of each slide so information technology'due south centered on the width of the drawer sides. And then, connect the slide components together to hang the drawers, and check their activity. Arrange the slides as needed to create even gaps between the drawers and and then the drawer faces shut flush with the front of the chest.
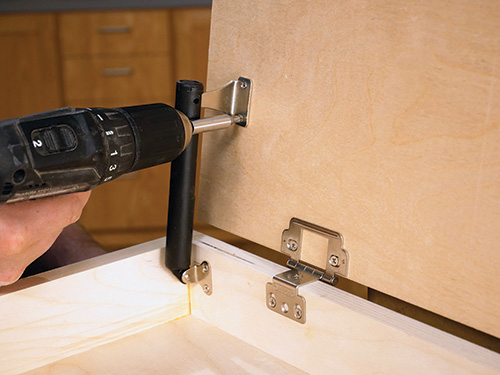
Cut and sand a panel for the chest lid. We installed ours with a pair of low-profile, partial wrap-around hinges that don't require mortising. Just mark their positions on the lid and back console, drill pilot holes and spike them in place. So, to keep the lid up while using tools, nosotros completed this projection's hardware needs with Rockler's Piece of cake-Lift Lid Support — it also simply screws to the chapeau and dorsum console.
Finishing Up
You could skip a finish on this project in order to hustle it into service, but eventually raw, blonde plywood volition begin to look grimy from use. Then why not apply ii coats of your favorite film terminate — polyurethane, shellac or lacquer — it will go along this tool chest looking groovy for years to come.
Difficult-to-Detect Hardware:
12″ Series 757 100-lb. Over-Travel Centerline® Lifetime Slides (2) #49778
Easy-Lift Lid Support (1) #66649
Stainless Steel 120mm Edge Pulls (ii) #1014281
Rockler Drawer Lock Router Fleck (1) #22637
Router Bit Set-Up Jig for 22637 Drawer Lock Corner Bit (one) #53810
1x Miller Tru-Fit Drill Bit (ane) #20300
1x Miller Walnut Dowels (1) #21366
Click Here to Download the Drawings and Materials List.
Source: https://www.woodworkersjournal.com/project-tool-chest/
0 Response to "Woodworking Plans for 3 Drawer Tool Box"
Postar um comentário